Saturday, August 30, 2014
Presenting the Bride and Groom
Its so hard waiting for professional pictures. But its nice she sent along this teaser photo. Congrats Patience and Brian on your one week anniversary.

Wedding Cookies and toule
 I loved making these cookies. I have a favorite sugar cookie recipe called Signature Sugar Cookies. I made two batches Out of one batch, I made 12 wedding dresses. Out of the other batch came 40 love cookies. The love cookies were put on the desert table. The bride dresses were put in cellophane bags and tied with a ribbon. The kids took them home.
Then it came time to decorate. The afternoon before the wedding, with advice and suggestions from my friend Willa, my sister and I hung toule, swagged pearls. Bunches of fresh Nova Scotia ivy dropped from the bows. It was just perfect.

Friday, August 29, 2014
Wedding Crafts - Part 3

 To finish the fans, a small elastic was used to hold the fan folded paper.
 Blue glue was used to join the two sides of the now accordion folded fan together.
After that glue dried, coffee sticks were added to the bottom of each side of the fan with the same blue glue.

As you can see I'm using my nice clover clips to hold the sticks on the fan while the glue dries.
 After the glue is all dried, I bring the two coffee sticks together and put an elastic on the handle to hold it in place. I like to play with the elastic and make like ballerina ribbons. So cute.
 The weather on the day of the wedding was beautiful and warm. It was warm in the church and warm at our back yard garden party. We loved that. The fans were really appreciated and put to good use. A good idea.
It's all about the Cake

 |
| Notice the time. Its 8am on the day of the wedding. I was feeling rushed since I had a hair appointment at 8:30. My sister was preparing to take over all duties. What would I have done without her help! |
 |
| My sister moves the cake to it's place of distinction. The "Love" topper needs to be added yet. |
.jpg) |
| A wire project we made at the cottage. Got it right the first time! |
Jessica, our oldest grand-daughter said these cupcakes were the BEST cupcakes she's ever eaten. Well I thought I'd share the recipe that my sister gave me to use. It's like an artisan cupcake. Not light and fluffy like a cake mix cupcake. They were a wonderful home-made cupcake.
Vanilla Cupcakes
Ingredients:
1 1/2 sticks unsalted butter (3/4 cup)
1 1/2 cups sugar
2 eggs
2 teaspoons pure vanilla extract
2 1/2 teaspoons baking powder
1/4 teaspoon salt
2 1/2 cups flour
1 1/4 cups milk
Directions: Turn oven on to 375 degrees F.
Put butter in mixer and beat at medium speed until somewhat smooth. Pour in sugar and beat well. Add 2 eggs. Mix well. Add: vanilla. Mix baking powder, salt, flour. add alternately with milk beating in as you go along. Scoop individual baking cups, until they are about 2/3 full. Bake for 20 minutes or until golden brown. Makes 18
Thursday, August 28, 2014
Wedding Crafts - Part 2
 This little wedding bear is not new. she was made when our middle daughter got married over 15 years ago. We made bears for the wedding party and used them for a decoration for her guestbook. Last week, when I was looking around for decorations for Patience's wedding, this white little bear was just perfect to sit on a table. She did not have a veil until I quickly whipped one up out of toule. At the end of the day, I was pleased to have a place to put my Mother of the Bride corsage. I just love this.
  This fun little poem that goes with the traditional Jordan Almonds gift was fun to make with all my quilters tools. Just so you know, a bag of Wilton Jordon Almonds has about 120 almonds in it. This will make 24 little favors.
The poem goes like this.
Five sugared almonds
for each guest to eat
To remind us that life
is both bitter and sweet.
Five wishes for the new
husband and wife -
Health, wealth, happiness,
children, and a long life!
 |
| With your applique mini-iron heat set a glue backed crystal. |
 |
| Print out and cut using Rotary cutter |
Wednesday, August 27, 2014
Wedding Crafts - Part 1
 For Patience and Brian's wedding, I did do a few crafty things. First and most important, I put together Patience's birdcage veil. We made it together. We did a mock up of the headpiece on my "ham".
When we had it sorta perfect, I glue gunned it down to a felt base then trimmed. It was just sweet. We added a few crystals to give it a twinkle. When we get the photographers pictures next week, I'll show you how perfect it looked on Patience for her big day.
 |
| Baby Phoebe was the youngest child. Just 2 months old. |
 |
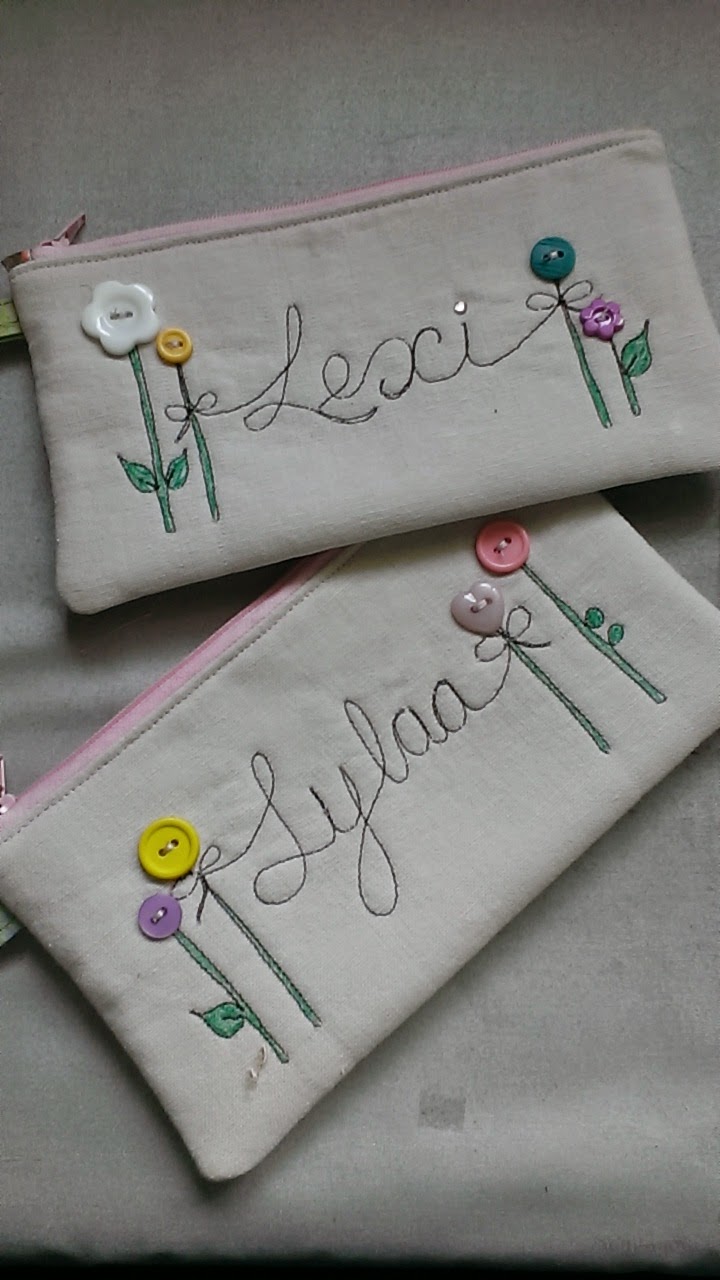
| 14 little pencil cases with cute bead zipper pulls |

Sunday, August 24, 2014
I'm back!
We had a beautiful wedding here over the weekend. It was really beautiful day is so many ways. I have no bride and groom pictures to share today and the professional photographer will get them to the bride and groom in all good time.
But I do have a couple of pictures of yours truly taken by our grandson Mitchell who was operating a photobooth.
But I do have a couple of pictures of yours truly taken by our grandson Mitchell who was operating a photobooth.
 |
| The groom with all the kids |
 |
| Caitlin and Grammie |
 |
| Me and Scott... Great friend of the Bride |
 |
| Me and Carli. A sweet girl from Ontario |
Friday, August 15, 2014
Almost Wedding time!
 It's almost wedding time. Our youngest daughter is getting married on August 23rd. We've been working on some crafty things for this little wedding for a while now, but now it's crunch time. We are in the last 10 days and this week we'll be working on house decorations, food planning for our small at home reception.
So, no blogging for the next little while. I'll be back after the wedding.
Wednesday, August 13, 2014
Making Dog Biscuit treats
 Kiddos are here for a little visit. We decided to bake up the rest of the dog biscuit dough that I made up on Canada Day. The kids each took one third of the dough, rolled to about a quarter inch. Then started cutting out the little circles with my large icing tip. Then with the small round end of one of the icing tips, we made the little paw prints. So cute. Then bake...
We made up 4 packages to give to the dog friends of the kids. After talking about what dogs like to eat, we worked up the nerve to taste them. No sugar, butter or chocolate in them, so they were a little bland... Good for Dogs though!!

Thursday, August 7, 2014
A tester Wallet Class
 |
| Jeannie Kaye's Wallet. The first one in the class done!! |
Look below at the nice idea Myrna had by putting the red frame around her wallet cover. Such a nice detail. She used fabrics from her stash, and was short on the outer fabric. How nice that she turned a bit of a problem into such a nice idea and option.
 |
| JoAnne's and Alta's Wallets |
 |
| Judy, Joann, Myrna and Lucy's Wallets |
 |
| Judy S.'s Wallet. Beautiful ! |
I'm pleased with how the wallets are very consistent. I really want to thank my tester students who spent the two mornings sewing with me and helped by giving me constructive feedback as we went along the class. This will make a smoother and more enjoyable class for my future students.
So, I'm officially putting this class on my "to Teach" list. It is a class that has lots of fine detail but nothing too much.
Subscribe to:
Posts (Atom)