Sunday, January 31, 2010

My House Table Runner

Back in November on her blog, my sister showed you the house table runner that I made for her. I first saw this table runner at one of the Friday Girls homes, while there for coffee one Friday. I really really liked it and it reminded me of the company houses that were common in Sydney, Nova Scotia. My family moved there as my Dad approached retirement, and they would settle there for good. By that time, I was married and not living at home. But I did visit there often.

Note: This pattern is called Houses on the Common by Stitch and Split Applique.

Well, I wasn't the only one who liked the runner. All the Friday Girls loved it. So we all agreed that we would each make one too. We would make ours out of bali/batiks and we would each make some houses to trade with each other so that there is a wide variety of fabrics in our runner.

So I made enough houses to make two runners; one for my sister, and one for me. I finished my sisters back in November and had a chance to send it to her when her hubby was passing through. So I put a mad dash on to finish hers. Mine on the other hand, sat and sat without being finished

So, this week, with all my "must-do" projects behind me, and not wanting to start anything new before we go away, I pulled out my unfinished table runner. It was all pieced together, all I had to do was layer, quilt and bind. A great one-day project.

I'm very pleased with it. I'm not sure what my favorite part is. It could be the free-motion smoke coming from the chimneys, or the free motion flowers in the four side triangle, or the whimsical doorknobs I put on the doors, or the fancy round windows on the houses.


And also, don't you love this little set of small plates in a rack my daughter got me for Christmas. They are the perfect to use when I host the Friday Girls coffee break. I used them for the first time this past Friday. Don't they look nice on my new table runner.

More Take Along bags

OK. I know you thought you were done with looking at all my Take along bags. I lied.

Here are the last of the Take-Along bags that I've made recently. I made an extra tall one for Patience to cart her personal stuff when she goes to the gym. And out of the same fabric to match her mothers, is a cute regular size bag for Baby Aurora.

People have asked where they can buy the Take Along bag pattern and the Wonder Wallet pattern. I've never seen a quilt shoppe that didn't carry the Lazy Girl patterns, so ask for it at your local quilt shoppe. Also, you can buy them at just about any quilting online store.

I also made Aurora a toothbrush bag for her to keep her toothbrush and toothpaste in at school (it's really daycare, but she calls it school) It's a modified rollie nester bag which is a free pattern from Studiokat Designs. Click here for the free pattern. It's the first time I've made this quick little pattern, but not the last time. It's so cute and so versatile. I'm not quite sure this little bag is big enough, so I'll make another one slightly bigger. It'll be a set. They don't take very long to make.

Saturday, January 30, 2010

On the Way to Disney


The triplets left this morning for the drive to Portland Maine, where they will catch a flight to Orlando. We had a quick visit just before they left to deliver their travel activity bags.


The kids were so excited, that they couldn't sleep last night. Poor Mitchell went into his parents room 15 times through the night. So it doesn't sound like Mom and Dad got much sleep either.

Have fun kids...

Friday, January 29, 2010

Princess Dress Makeovers

Remember last summer, our grandkids were in a big family wedding in Nova Scotia. My sister and I had made all kinds of white dresses for the girls to wear. They were lined and double sashed with whimsical green flowers. They were sweet.

This week, in preparation of the triplets big trip to Disney next week, I did a mini-makeover on their white dresses so that they would have a princessey dress for the Breakfast with the Princesses while they are at Disney.

.
With a couple of yards of maroon organza, here is Princess Caitlin, with her poofy accents around her shoulders and double skirted overskirt, she is all ready to curtsy with the princesses at the Princess Breakfast. I wonder which princess she will like the best.
.
Here is Princess Grace.
She assisted in the design of her makeover dress. She wanted the front of her poofy overskirt to be curved open to reveal the white dressy dress underneath. She loved the shoulder detail and loved the pink button that was in the middle of her shoulder piece. She said that she is going to talk to Princess Aurora at the breakfast and tell her that she has a little cousin named Aurora.
.
And where was Prince Mitchell in all this fashion makeover. He's making a nice picture for my fridge using my wonderful Bargain Harley Faber Castel crayons.. He's not having anything to do with this Princess Breakfast stuff. He will do something special with his Dad on that day.

Wednesday, January 27, 2010

Crazy Quilt Socks * 3

I'm pleased that I have almost finished my 3 Crazy Quilt Christmas sock foundations.
You can see that the third sock is all foundation pieced in the 3 big pieces and all I have to do is to sew the 2 seams to join them.
.
My friend Lois developed this foundation scheme. My other friend Linda H. taught a CQ Sock class a while back and we wanted to spend as much time stitching as possible. So I suggested that in order to make the foundation in as little time possible, let's make a foundation pattern. So, that's when we asked Lois if she could design the 3 piece foundation plan so that it wasn't starting with the typical 5 sided foundation piece with the concentric pieces added on. And she did in no time flat. Actually she scratched it on a little piece of paper and then Linda H. and I transferred her design onto a full size pattern. And it works great. This will make a total of 6 socks that I've foundation pieced with this pattern.
.
After serging around 2 of the socks, The thread broke on my serger and I lost the tension and settings. I love my serger for all the little things I do on it, but I absolutely hate threading it and doing the adjustments on it to get a nice serge stitch.
.
Timing is everything. The first issue of CQ Online magazine for 2010is out. I know I'll get some inspiration here) http://www.cqmagonline.com/vol09iss1/index.shtml
.
I'll have my serger up and running next week, and the third sock will be finished in time to take with me when we head south. I haven't decided the dates yet but I think I'll blog weekly about my crazy quilting progress on these socks. It'll probably be for a period of 6 weeks starting towards the end of February.
.
Want to join me?
.
(PS: The word serger is not in bloggers dictionary)

Sunday, January 24, 2010

Blowing out 26 candles

We had a big birthday supper today, with individual ice cream cone looking cupcakes for each of the birthday guests.

So here's a math problem. Can you figure out how old the kids are. There were a total of 26 candles blown out, and 3 kids are the same age.

Happy Birthday Caitlin, Grace, Mitchell and Aurora.

Saturday, January 23, 2010

My Crazy Problem

This weekend I plan to sew the foundations to my Crazy Quilt project. They are 3 Crazy Quilted Christmas Stockings. I did one the year before last for Baby Aurora. This past Christmas, I showed you two that I did for my oldest two grandchildren, Jessica and Emily. So, from that, you probably know that these next 3 stockings will be for the triplets.

After consulting with my CQ teacher and mentor, Linda H, about color choices since there are 2 girls and a boy, yet I wanted these 3 stockings to be somewhat similar, I decided to make all 3 bases in whites, creams, ecru colors. I will lovingly embellish these bases with colors to suit each child.

In my stash of CQ fabrics, I had a bit of white and cream, bit I soon found out that I didn't have near enough. So my mission over the past few weeks was to get the fabrics.

I bought a few small pieces of fabric at Fabricville last month to augment my crazy quilt fabric collection. But it wasn't enough. I thought I was going to be smart, and I hit the thrift stores. I was unsuccessful. There wasn't anything there that would be suitable and it was a bit on the expensive side.

So I dropped into one of our local quilt shops, Country Crafts and Curtains. It's a very small quilt shop and I love all the bali batiks they have. But that day I was on a different mission. I spoke to Dianne, the shop owner, and told her of my crazy problem. She said she would look through her expired curtain fabric sample books to see if she could find me something. She said she'd call.

Well two days later, right after getting home from another trip to Fabricville in search of fancies, there was a message on my machine.


Dianne had found something for me.

I hit the road again, and I was just thrilled with the small book of fabric samples that she gave me to work with. I tee heee'd all the home and I couldn't wait to flip through to select my keepers. The different textures are wonderful. Have a look. I'm going to have so much fun with this variety. I'll show you the three completed CQ bases next week. The embellishing will start next month.

So the lesson here is, don't be afraid to ask your local quilt shop for help. They might surprise you.

Many thanks Dianne.

Friday, January 22, 2010

Machine Quilting the Sampler

Earlier this week, I showed you the base for a free motion machine quilting sampler that myself and a couple of the other Friday girls are working on.

Last evening, as I sat down at my machine to start stitching, I had a bit of stitching fright... where do I start? will I do exactly what's in the picture? should I strive for even stitches or what? So many things to think about. It's a good thing that we were going to all bring our projects each week, because it forced me to at least start.

So I did this wavy line up the center of one of the furling frawn motifs. Is that even what it is...
.
I was so pleased at the progress that the other 2 Friday girls made.

This is Lee's progress. These mussel shell like curlies are very smooth and even.
.

And I love the great job she did on these lines that change direction. So nice and even. All the Friday girls loved them. I think I'll do that section next on my sampler.
.
Vivian had fun with the pebbling. We all think that the pebbles take way too long. But aren't hers nice... And her little wavy designs are so effective and soothing.
.
She also did these little leaf like designs. They are so nice and they turn every which way like they're supposed to. Nice job Vivian.
.
So I have my work cut out for me. This week, I need to relax a bit and just stitch.
.
Watch for another sampler update next Friday.

Thursday, January 21, 2010

Fun at Fabricville

I love a bargain. Any regular visitors to the Fredericton Fabricville store knows about their bargain shelf near the back of the store. I routinely look there for great finds. I've bought great fabric for Halloween costumes, or my more recent Egypt costumes.

Today, I came out of the store with 6+ meters of great stuff for my non-quilting stash. I always seem to find a small quantity of light or white light twill that I use to re-cover my ironing board cover with. My ironing surface is a home made big board and a meter and a half of this type of light twill is just perfect to lay over the board.

I also got a great piece of ecru colored silk like fabric, that will make a great linings for 3 CQ Christmas stockings that I'm getting ready to prepare the bases for.

The final piece of fabric is a 3 meter piece of lightly patterned heavier twill type of fabric. I don't know what I'll use it for, but I really like it.

But my greatest buy of the day is a H.A. Kidd 26 spool kit of threads for $15.00. Heaven knows that I have tons of thread, but this little kit has many colors of threads, and comes in a plastic case. It fits perfectly into my "sewing take-along bag". I keep this bag stocked with things that I will need if I go out sewing for the day.

Wednesday, January 20, 2010

Take-Along Bags - The Final Episode

Did you see my sisters post today. She showed most of the nice take along bags she made for gifts this past year. They are so nice. The black backgrounds give such a great starting point for using the embroidery. I love the fonts that she used.


Last week, I showed you three of the Lazy Girl take along bags out of the six that I had made kits for.
.
Here are the final three that were on my to do list. The triplets are going soon to Disney for their 8th birthday. They know I'm making the bags and and they helped me pick out the fabrics from my stash. They call them their toothbrush bags.

.
Instead of buying them a gift for their birthday, they are getting US cash so they can spend it on souvenirs. I also got them a little travel gift of a McDonald's gift card for when they are on the long drive to the Portland airport. I hope Mom and Dad are planning a stop at McD's. Out of the fabric remnants, I made the Lazy Girl wonder wallets to put their cash and their McD's gift card in.

That's it, no more Lazy Girl projects for me ..... this week anyway!!

PS: I was thrilled to see that the Lazy Girl herself left me a nice message on my Library Bag blog post last week.

Monday, January 18, 2010

A free motion machine quilting sampler

Have you ever seen Sharon Schamberg videos on youtube. She's an amazing machine quilter/teacher/artist. She enters her quilts into competitions that allow Internet votes. I've voted for her quilts many many times.

I love love the way she free motions so easy and I would love to do what she does but without the pressure of competition or doing it for somebody else. This video where she demonstrates her quilt halo, is amasing. She invented it and I think it would be a great tool to use. I will buy it when I go to a quilt shop in Florida in early March.

But for now, I decided I wanted to do a quilt sampler like she did here. I didn't buy this DVD yet, but I am going to buy one. I'm just not sure which one.
For now, I just traced the design onto a piece of fabric and I'm starting to do stitch down the base lines using a walking foot. The really nice thing is that a few of the Friday girls are joining me in this little exercise. It will be fun to learn as we move from section to section.

I'm using my Juki TL98Q domestic to do this and already I've learned something. I found out the value of a knee-lift, which lifts the pressure foot so that you can turn the piece a little bit. I'm not used to it yet, but I'll continue trying to use the knee thing.
I realized that I'm not that great with the walking foot on the Juki. I started to sew up a line, and the fabric shifted quite a bit by the time I got to the top of the line. I guess that was because I didn't have enough pins, so I had to take out the line of stitching with the seam ripper. grrrr....
Do you think I have enough pins along that path now?
My plan is to free motion for 45 - 60 minutes each week on this sampler. Stay tuned for the next few Fridays. I'll show the sections that I have completed on this project.

Sunday, January 17, 2010

Take-Along bags III

Remember last week I had 6 kits prepared for some Take Along bags . I had to put the kits out of sight until my blue quilt top was sewn.

So now that the quilt is done, I can have some fun sewing little things this week. Today, I finished three of the bags. I really like them. The two with made from funky love fabric are for my oldest two grandchildren, Jessica and Emily who are going on a winter vacation with their parents on Monday.


The other black and white baby bag is for a young soon to be mom who will have a baby in March. I've gathered all kinds of things from around the house that she might need in the hospital. I'll add a drugstore gift certificate to complete the gift.

Next week I'll finish the other three take along bags for the triplets who leave on a Disney birthday vacation at the end of the month.

Saturday, January 16, 2010

A sick baby Aurora visits.

On Thursday baby Aurora came for a sick visit. She had a bug and couldn't go to daycare with the bug. The minute she got here, she seemed to be on the mend. After not eating for a day or two, she was getting her appetite back. When she got to the house, she went right to the cupboard and pulled out a pudding. She was enunciating "puuuuddddding" so I let her eat it. It was gone in a flash. She started on a second pudding and I thought I had better feed her some soup or something. So she had some chicken noodle soup. It went down almost as fast. I think the bug is over and she's getting back to her old self... that fast.

So everything was pretty normal on Friday. She was her busy self. All my little coffee break and sewing project plans went out the window. Grammie and grampie followed her around all day. We tried to take her for a walk at the Willie in her stroller, but she wanted to play hockey. That walk lasted 20 minutes. So home we came and we went out on the road for a little walk. She fell off a chair once while I was preparing supper and just about gave grampie a heart attack. Now ,to keep the peace, we don't let her on any chairs.

When it came time to eat supper, she didn't want any of the turkey pot pie we were having, and she started demanding pudding. "Puuuudddding", she was saying very clearly as if I didn't know what she was saying. ha ha... I knew very well what she was saying.
Do you think she got her pudding?
Yep, she did.
She's such a sweetie. How could I say no!!


Wednesday, January 13, 2010

Let me show you the Blue Quilt named Square Dance

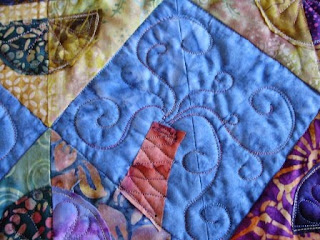
I'm pleased to show you Square Dance. It's a queen size pieced top for the St. Dunstan's Quilters. They they will be hand quilting this quilt this year and using it for their annual raffle. I had been referring to this quilt as the blue quilt.

I mostly sewed this in the first few weeks in in December and then put it away the week before Christmas to concentrate on festive things.

Just before I put it away, I noticed that there were some "Y" seams at the edges of the main part of the quilt. I stressed over these, and put a ton of thinking into how to avoid those seams. My intent was to finish this quilt last week, but still didn't want to pick it up again and start because I knew I had to deal with the Y seams. Well, I couldn't think about it any more and I just gave in. I'll do the darned seams. Actually they were not near as bad as I thought they were going to be. And 3 days later, it's done.

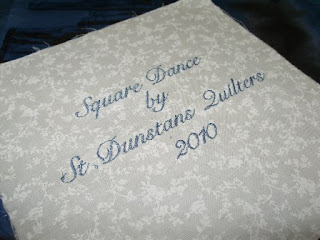
I don't know what the name of the pattern is or what book it came out of so I named it after getting some input. Everyone liked the name Square Dance. I did the label while visiting my sister over the holidays. I like it.

I'm all ready to show this at "Show and Tell" at quilt guild next Tuesday, then this goes to Rose, the head quilter for marking and quilting.

Done is good.

PS: If anyone knows the real name and origin of this pattern, will you let me know. Thanks

Tuesday, January 12, 2010

Take-Along bags II

It's hard to tell, but here are the sewn components to make the six take along bags that I spoke of last week. Last week I cut the kits out and said I would not allow myself to work on them until my blue quilt was done or a snow day came.

Well, my blue quilt is not done and we haven't had a snow day.


The kits were sitting on my cutting table and were just to irresistible not to do a little work on.


Here are the 12 sides: layered, sewn, trimmed, and turned right side out and pressed, and 6 zipper panels all sewn ready to be applied to the side panels.


That's it, I'm not working on these any more until my blue quilt is done.

Monday, January 11, 2010

Library bags

When I was young, in grade school I carried what my mother called, a library bag. It was a simple cloth bag that I carried library books that were given to us to read. Well, this week, out of a big piece of wild fabric, I made 6 library bags for my grand kids.

I used the Lazy Girl Designs free tote bag pattern here. It does take more fabric than other bags, but it is a nice substantial bag that is finished inside and out. I used fabric dimensions to make the bag smaller. It was easy to apply the handles and hide the handle ends. I really like this pattern and I think it will be one that I use again.

Since all the bags look alike, I took the opportunity to make little things that will hang on a loop on the handle of the bag that will differentiate the bags.
I used scrap fabric and batting and made little raw edge quilt initials and sewed a ribbon to hang on the bag loop.
And at Friday coffee, one of the Friday girls, Vivian was cleaning out her sewing room and brought a give away bag of things. Guess who took home most of it... ME. This inspired me to make "Bling on a String" danglies to hang on the loop of the bag too. Thanks Vivian!


Now the next fun part will be to fill these bags with things that will be fun for the travelling part of the trip.

I hope the kids will like them and re-use the bag later for something else.

Sunday, January 10, 2010

Mini Laundry Makeover

Last week I posted about our new washer and dryer.
Initially we thought, we would be able to fold clothes on the top of the laundry pair. But there is no back lip and since these are about 6 - 8 inches from the back wall, some smaller clothes would fall in the back. We don't need any more missing socks.
So, this week my fabulous hubby installed a work counter to go over top of our the front load pair. A trip to Kents, a bit of labour and a hundred dollars later, it was a quick DIY project.
I love it.

Wednesday, January 6, 2010

Take-Along bag by Lazy Girl Designs

When I'm looking to do a simple project in an afternoon, I keep a list of people in my head who could use a Take-Along bag. This fat quarter friendly pattern is by Lazy Girl Designs and almost every quilter I know has one that they tote their sewing stuff in.

I've made them for a couple of soon-to-be moms. Along with the bag, I've included a drug store gift card and some maternity related items they might need while in the hospital. See the one I made for Denise here.

A couple of years ago, I made a Coffee Cat Bag and filled it with coffee inspired spa items for a Run for the Cure auction. I've made these same Coffee Cat bags for my three girls, my sister and her two girls. I loved using that java cat directional print just for these bags.

.
I was looking to do a small project yesterday before diving into finishing my blue quilt, so I pulled some fabrics from my stash to make a bag for myself to travel with.

Just after I finished making it, I realized I know 5 children who are old enough to have their own travel bag and it just so happens they'll all be taking a big trip soon. I also know a mom-to-be. While no sewing was done today, I did spend some time pulling fun fabrics, matching up zipper colors and cutting kits for the 6 bags. This will be a good sewing project for a day next week, maybe a snowy day! Watch for a picture of those finished bags after the next big snowfall.

Yep, the Take-Along bag.. it's one of those patterns I'll use for a long time yet.

Monday, January 4, 2010

A shoe, a carrot peeler and a rubber ducky.

Last week while visiting Auntie Donna in Nova Scotia, I saw she was writing something with her special zig markers. It was on the back of a puzzle.

Next thing I knew she was breaking up the puzzle and said "Here, take this home and you can tell the triplets that after the puzzle is made, there will be a special message on the back".

This was the box!! "400 pieces" I said to her, "are you nuts?"

It's a week later and we're back in New Brunswick and I called over to the triplets house to see if they wanted to come over to do this special puzzle. Caitlin and Grace and Mama came over. Mitchell didn't feel like coming over so he stayed home. He'll be sorry, cause he's good at puzzles and he missed a good time.


We opened the box and the kids could clearly see that there were bits of writing on the back of the pieces. There was a couple of little clusters of the puzzle that were still intact. Caitlin grabbed those groupings and laid them on the table in front of herself. I asked her if she wanted me to break them up. She threw her body over them and said NO!!!


We spread out all the pieces and started sorting them. Mama, Grampie and Grammie did the outside and the girls worked on the snowmen on the inner part of the puzzle. It should have been the other way around because the outside were bigger pieces, but they were all the same color.

An hour later, we've made good progress. The outside edge is done. Grace is good at finding those special pieces so everyone is telling her what to find for them. With all the stress, Grace is getting giddy and tired and needed a cupcake break. Actually, Grammie did too.
Then we carried on. It's another hour later and we're getting to the end. Time for Caitlin and Mama to have a cupcake break. Grace is showing her sense of humor here. She's giving us the Peace sign rather than looking for the piece.
After the break, we're down to the last 12 or so pieces and it was quite exciting. The kids caught grampie slipping a piece of the puzzle under his hand. We got to the end and there was a piece missing. Everyone blamed grampie. But Mama swooped her hand over the top of the puzzle and there was a piece that blended so well with the background, we didn't even see it sitting on top and she got to place the final piece.
.
Yippee, it's done and it's sweet. It's 3 snowmen by Jim Shore. That would really look nice in my sewing room ,wouldn't it. It has lots of quilty details on it.
.
But wait, it gets even more exciting. We flipped the puzzle over and the kids read the message that Auntie Donna wrote out for them. There were a few jokes and then a fun of a scavenger hunt. The message had the kids running to different parts of the house to retrieve special things. a rubber ducky, a shoe, Grammie's favorite scarf, a carrot peeler and their favorite buttons out of the button box. Then when they got all that stuff, the final clue led them to find the prize which was hidden in the kitchen, under the stove, inside the WOK.
They were little Boyds bears that Auntie Donna had sent up with me. They took the third Boyd bear home to Mitchell. Grace didn't want to hug it cause then it would bond with her and it might think she was it's mother.
When it was all over, they said "That was so much fun".
They loved their little adventure Auntie Donna. You are the best!
Post Note: You can check out Donna's blog here to read about the puzzle.

Sunday, January 3, 2010

The Bookkeeper

Last summer I saw this really sweet pattern on the Moda Bake shop website. It was called a bookkeeper. It is intended to hold a kindle or novel style book. I have been looking for something that will nicely hold my Weight Watcher booklets, flyers, points guides, and food logs. I tried making a prototype folder that had slots for each kind/size of book. I knew it was too complicated, but kept my books in this prototype for lack of a better place. I would keep my eye out for a better solution.


With all the talk of fitness on the Wii last week at my sisters house, I thought again of how best to store my Weight Watcher books. In talking with my sister, the Moda Bake Shop's bookkeeper came to mind. When I came home, I got to work measuring the books and adjusting the pattern.

This is my version of the Bookkeeper, made especially to hold my Weight Watcher books.
.

I know that there are many quilters/sewers who are Weight Watchers, so for them, I'll let you know what I did to adjust this pattern to fit the books.


  • The starting size of the batting is 18.5" x 11".
  • Apply ten 1.5" strips instead of nine to the batting.
  • Trim the batting to 18" x 10.5" instead of 17.5 x 9.5
  • After 3 layers are together, stitch a line 5.5" up from the bottom instead of 6". This will be your fold line.
  • You will need about 6 to 8 inches more of binding than the original bookkeeper pattern calls for.

Leave me a comment and let me know if this works for you.